
You now have one place to manage the information flow in your Organisation - being able to attach data to your reports in Wink is going to be a huge help.
Happy days! Wink Reports has created a new type of column to add to your Data Explorer Reports, namely: an Annotation Column. We've added a column to each row of your report - this is a place you can use to capture additional information in Wink Reports when you've got nowhere else to store it. In life before Annotation Columns, you'd have to capture this information in spreadsheets or other systems, painstakingly merging and consolidating the data into one report. But now, simply modifying your business workflow to build Annotation Columns in the reports you use daily, allows your business users to capture all this information in one place.
Here are some rules to apply when you use Annotation Columns:
- It's important to nominate the Key Columns that will identify which row the annotated data belongs to when you add an Annotation column to a report. Key columns must be unique for every row. Wink will then store this data outside of the report and display it in the corresponding row.
- Don't confuse Formula columns for Key columns - formulas display data and cannot be used for stored values. So, you cannot use a Formula column as a Key column.
- If you choose to modify the Key columns that Wink recommends for you to use, make sure to select unique key columns for each row. There should never be an empty or NULL value for any row in your report. Always ensure you cross-check your key column selections for all of the data in your report.
- In the event that you've got more than one row for the column that you wish to use as a key column, rather select a different report to create your annotation column. For example: we would recommend adding a tax rule for a Customer to your Customer Report rather than Customer Invoices report. Remember that your Invoices report can have multiple rows for the same customer. When you've added the data annotation to the Customer Report, you can then use this report as a data source to merge with the Customer Invoice reports, and incorporate the annotated data in that way.
- You can also attach notes to events using date columns. Adding date columns to a key column selection will make multiple rows available to you for data annotation. When selecting a date column, ensure it's a unique date that your system cannot modify. Modification of the date you selected will cause your data annotation to be lost.
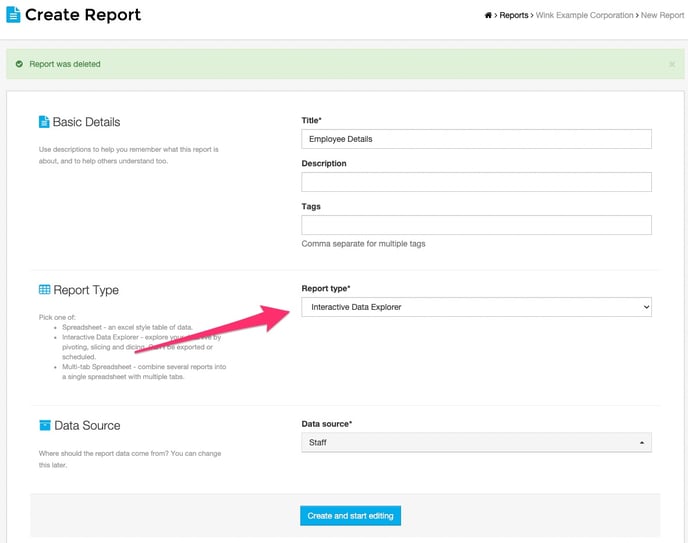
- Annotation columns are only available in Interactive Data Explorer report types. If you cannot see the option to add an annotation column, you need simply convert your report to the correct type.
Follow these few simple rules and adding Annotation columns will be easy as pie. Let's take you through the process step by step:
- Create a report using the Interactive Data Explorer Report type.
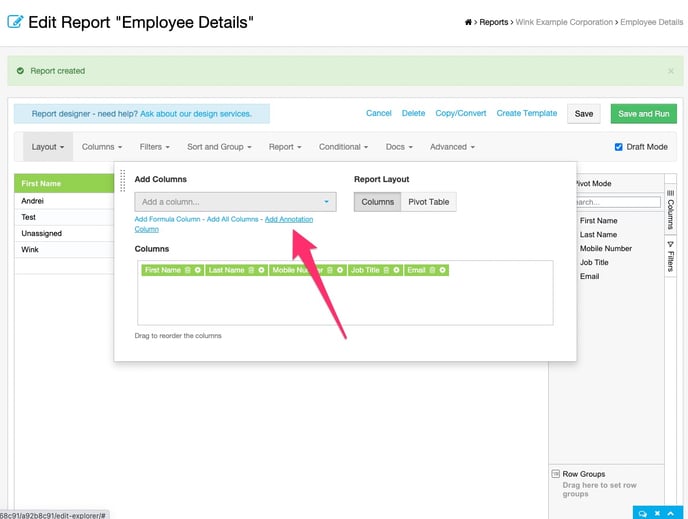
- Select Layout and click Add Annotation Column. This will add a new column to your layout.
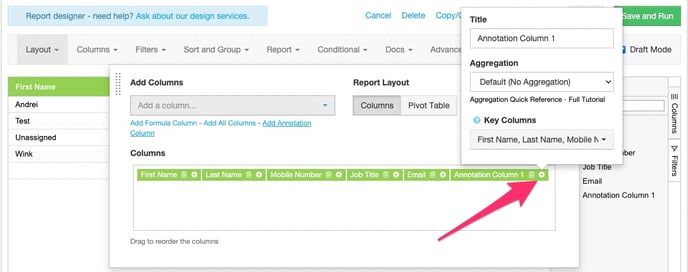
- When adding an Annotation Column to your report, the first three columns will become your unique identifier. Click Settings on the new annotation column to review your key column settings.
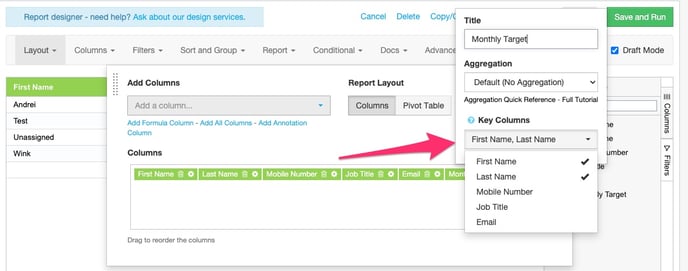
- If you need to modify the key column settings, select the drop-down menu and toggle the columns you want to use to create the unique identifier for each row in your report. Remember the important rules for using annotation columns!
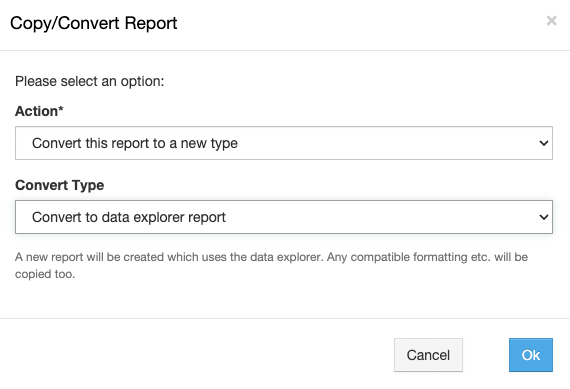
- If you have an existing report that you want to add an Annotation column to, you may need to convert this report to a data explorer report. Click on the Copy/Convert link and complete the steps in the pop up window.
- Happy Annotation.