Use the Dashlet Filter Overrides to create custom views of your main Dashboard that can be shared, without making multiple copies of it.
Wink’s Dashlet Filter Overrides allow you to create custom result sets, commonly using specific date ranges, to get different views of the same dashlet. For example, you can use the same dashlet on your Dashboard to show Daily, Weekly, Monthly, Quarterly or Yearly numbers, simply by locking the date range filter for each copy of the dashlet.
This is powerful when used together with your report’s default filter settings, which allows you to see how the results change when you change a default setting, such as changing from a company overview of sales to the performance of a specific salesperson. This is especially important if you want to customise dashboards and share the results with colleagues or team members. You’ll find everything you need to know about sharing in our how to share custom dashboards guide.
The Dashlet Filter Overrides give you:
- One main Dashboard that contains all your important metrics
- With different views determined by changing a default setting (i.e. from overview to specific, like total sales to sales person)
- Shared by URL (i.e. no need to replicate the dashboard to share specific views)
If you first need to set up your dashboard before customising your dashlets, follow this creating a dashboard guide.
How to use Dashboard Filter Overrides:
- Add the dashlet to your dashboard as many times as you need to create the different views you want. For example, we want to view our Sales for (1) Yesterday (2) This Month and (3) This Calendar Year, so we will add the Dashlet to the Dashboard three times.
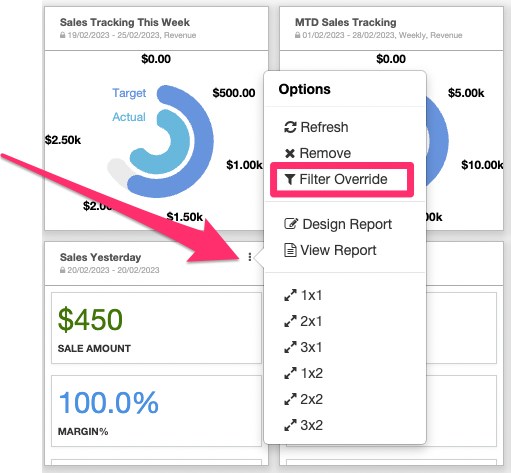
- For each dashlet, click on the three vertical dots to open the menu and select Filter Override. Each time you make changes to the dashlet, you may need to Refresh to see the results. You’ll find ‘Refresh’ in the same menu.
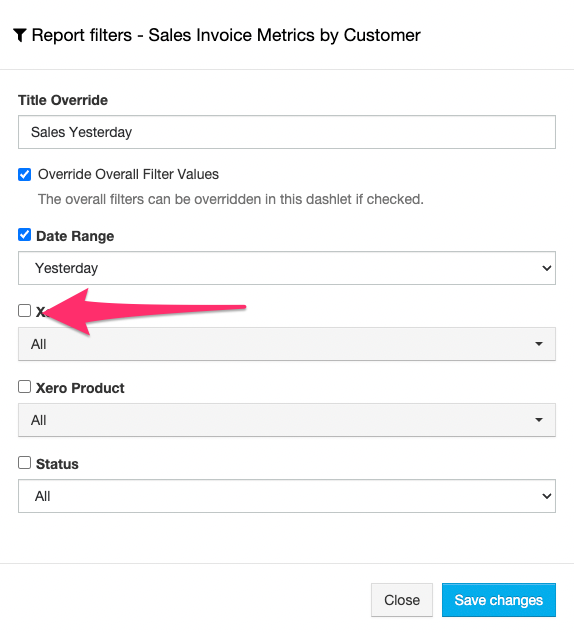
- Select the report filter that you want to customise. In this example, we want to set the Date Range to Yesterday, so we leave the Filter checked and select Yesterday from the drop down options. We also leave the other filters un-checked, which means the default filter settings will be used. It’s important to use the Title Override to remind yourself that this Dashlet is filtered to show results for Yesterday.
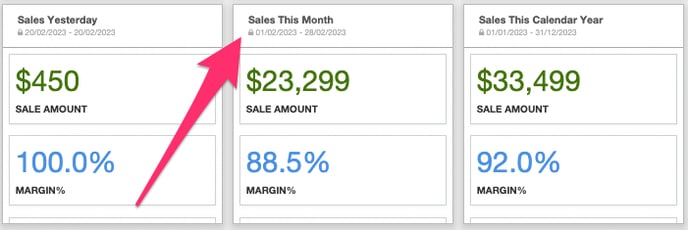
- Repeat these actions for each dashlet to set the different date ranges you want to see. As you save each dashlet’s Filter Override, a padlock icon will appear so you can always see which data has an override in place, and what you have selected.
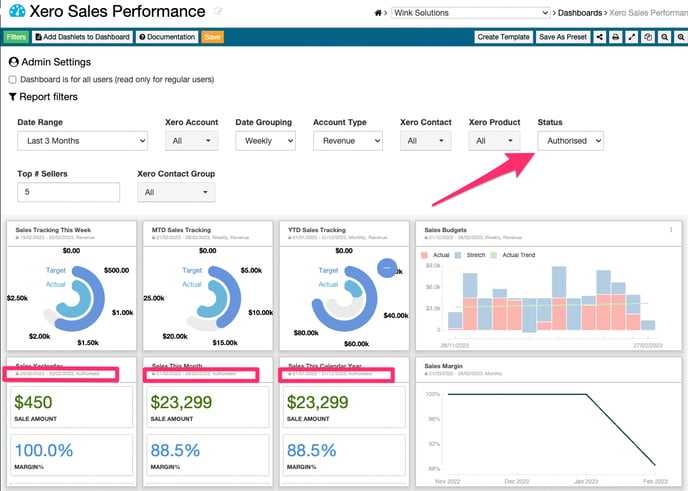
- Changes to your dashboard’s default settings will not impact your filter override settings. In this example, we want to know total sales for ‘Authorised’ Invoices that are not yet paid, which sets the criteria for what type of invoicing data is included in the results.